[adinserter block=”1″]


Let’s talk about the different types of braids.
Braids are a fun way to style your hair. They can be casual or glammed-up for formal events, depending on the type. It’s always fun to explore new braided hairstyles, but it can also be overwhelming to sift through all the options out there.
That’s why I wanted to break down some of the most popular and versatile braids in this post. From classic French braids to romantic fishtail braids, I’ll walk you through the different braid styles, along with pictures for inspiration.
So get ready to dump that basic ponytail and elevate your hair game with these gorgeous and versatile styles. Trust me, you won’t be able to resist trying out these different types of braids after reading this post!
💡TIP: Pin this article to your braids board on Pinterest so you can always come back when you need some hair inspo! 👇🏼👇🏼👇🏼

#1. Basic 3-Strand Braid
The 3-strand braid, also known as the “classic braid,” is like the OG of braided styles. It’s really easy and the most common type you’ll see.
To create this braid:
- Start by dividing your hair into three equal sections.
- Cross the right strand over the middle one (which becomes the new right section).
- Take the left section and cross it over the new middle section.
- Keep going with this pattern all the way down and secure the end with an elastic.
It might take a few tries to get it right, but it’ll be a breeze once you do!
#2. French Braid
This elegant braid style seamlessly incorporates hair from the outside into the braid, making it perfect for both formal and casual occasions.
This braid also starts with three sections of hair and is similar to the classic, regular braid. However, you’ll start the braid closer to your scalp and add more hair each time you cross a section.
This continuous integration of hair gives the French braid its distinctive appearance. While it may sound a bit complicated, remember, practice makes perfect!
#3. Dutch Braid
Next is the Dutch braid, often called the “reverse French braid.” This style is a great way to add more volume and drama.
This process is similar to that of the French braid but with a twist. Instead of crossing your hair sections over each other, you’ll cross them under. The result is a stunning, raised braid that stands out from the rest of the hair.
#4. Waterfall Braid
The waterfall braid is a stunning variation that gives the illusion of cascading hair, just like a waterfall. This style is great for those who want a braid while still keeping some hair loose.
Start the waterfall braid with three sections of hair on the side of your head. Like the French braid, begin by crossing the top section over the middle, then the bottom section over the new middle.
Here’s where things are different: drop the bottom section of hair, letting it hang loose to create the “waterfall” effect. Pick up a new section of loose hair from right behind where you dropped the previous one, making that your new bottom section.
Continue this pattern around your head for a beautiful, flowing look with a relaxed, bohemian feel.
#5. Box Braids
Women from Africa have worn traditional box braids for centuries. Over time, this look has gained international popularity for its beauty, versatility, and protective qualities.
Box braids are created by sectioning the hair into square or rectangular “boxes.” Then, braid three strands together all the way to the ends, using either natural hair or hair extensions. Since the sections are distinct and clearly visible, they appear as a neat, grid-like pattern on the scalp.
These braids are not only stylish but also a great protective style. They reduce stress on the hair and scalp, providing a break from daily exposure to harsh elements.
With the right care, you can wear them for many weeks, making them a good choice for those with a busy schedule.
#6. Micro Braids
Micro braids, as the name suggests, are small, delicate braids, often about the width of a pencil. They’re perfect for those who love detail and have the patience for braiding, as they can take several hours – or even days – to complete.
One advantage of micro braids is their versatility. You can wear them straight, curl them, or even weave them into larger braids – the possibilities are endless! They are easier to manage than other types of braids due to their size, making them less likely to become tangled or knotted.
But remember that micro braids are so small they’re more taxing than larger versions. It is essential to give your hair a break between braid installations and take good care of your hair and scalp while wearing them.
#7. Infinity Braid
The infinity braid results in a beautiful pattern that resembles the infinity symbol. While this braiding style is more complex, the result is well worth the effort.
To create an infinity braid:
- Start by dividing your hair into three sections.
- Take the middle section and divide it in half – these two strands will serve as the center of your ‘infinity symbol.’
- Weave the outer strands around the center in a figure-eight pattern, taking additional hair from each side as you go along.
- Once you reach the end, secure the braid with a hair tie.
The infinity braid is a captivating hairstyle, and can be worn for any occasion.
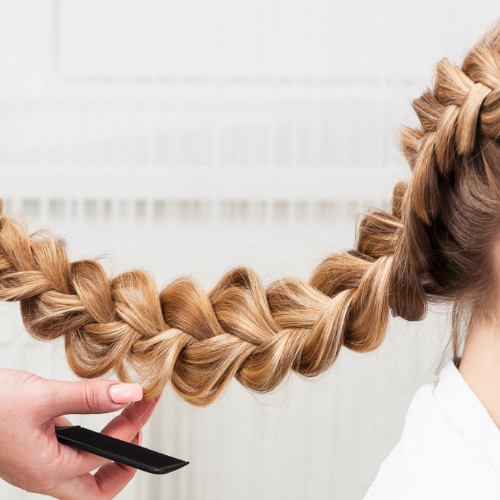
#6. Rope Braid (Twist Braid)
Simple yet stylish, rope braids (also known as twist braids) are one of the easiest braid hairstyles to create, perfect for beginners.
Start by splitting your hair into two equal sections. Twist each section tightly in one direction, then twist them together in the opposite direction to create a “rope” effect. Secure the braid at the end, and voila, you have a beautifully twisted rope braid!
The best part about this look is that once you unravel a rope braid, you’re left with gorgeous waves and a whole new style to rock.
#9. Milkmaid Braids
This vintage-inspired hairstyle has roots in various cultures, dating back to the countryside of old Europe.
The beauty of milkmaid braids lies in their simplicity. To create this look, begin by splitting your hair down the middle into two sections, and then braid each one into a basic 3-strand braid.
The magic happens when you lift each braid over the top of the head to form a braided crown. Tuck the ends under the braids and secure them with bobby pins for beautiful milkmaid braids!
#10. Ladder Braid
Even though this look might seem more intricate, don’t let it intimidate you! It’s simply a combination of a classic braid and a waterfall braid.
To make a ladder braid, start with a waterfall braid. Leave some hair strands out while braiding along the side of your head. These dropped pieces then become the “rungs” of the ladder braid.
After you finish the waterfall braid, you start a second braid parallel to the first, incorporating the dropped pieces from the waterfall braid into the second braid.
#11. Lace Braid
This braid type involves adding hair from one side, creating the appearance of a “laced” braid.
To do a lace braid, start by sectioning off a part of your hair where you want the braid to be. Then, do a French braid, but instead of adding hair from both sides, only add from the side closest to the face.
This makes the braid appear to be cascading down your hair, creating a stunning, delicate effect.
#12. Fishtail Braid
This popular hairstyle is surprisingly simple to create. Named for its resemblance to a fish skeleton, this braid looks chic for any occasion.
Creating a fishtail braid involves splitting your hair into two sections. Then, you take a small piece from the outer edge of one section and cross it over to the inner part of the other section.
Repeat this process, alternating sides until you reach the end of your hair.
#13. Cornrows
Cornrows are a traditional African hairstyle with hair braided closely to the scalp. This type of braid is achieved by using an underhand, upward motion to create a continuous, raised row.
Cornrows are not just stylish, but they also hold cultural significance and history. They’re often done in straight lines but can also be formed in intricate geometric or curvilinear designs.
Even though they’re possible to do on your own, it’s best to start with a professional. This ensures they look neat and even, especially if you’ve never done them before.
#14. Feather Braid

riileh
Next up is the feather braid, an enchanting, feather-like hairstyle that adds a whimsical touch to any look. This braid is a variation of classic braids, with pieces of hair left out in each turn, creating a “feathered” effect.
Creating a feather braid begins much like a French braid, dividing a section of hair at the crown into three parts. As you braid, instead of pulling all of the hair into the braid, you’ll leave out small sections every time you cross over.
These left-out strands of hair form the “feathers” of the braid.
#15. 4-Strand Braid
If you’re ready to venture beyond the traditional 3-strand braid, let’s talk about the 4-strand braid. This gorgeous braid style offers a thicker, more intricate look that will surely make a statement.
Creating a four-strand braid involves separating your hair into four equal strands. Starting from the left, take the first strand and weave it under the second, over the third, and then under the fourth.
Repeat this weaving pattern, pulling each strand tightly for a well-defined braid.
#16. 5-Strand Braid
And if you want to take it even further, let’s look at the 5-strand braid.
You must separate your hair into five equal sections to create this look.
Starting from the right, cross the first strand over the second, then under the third. Next, cross the fifth (far left) strand over the fourth, then under the one you’ve just moved. Continue this pattern – over, under, over, under – until you reach the ends of your hair.
The 5-strand braid is a beautiful option for a unique, complex braid style.
It works best with longer hair lengths due to the number of strands involved, and it can be dressed up or down, depending on the occasion.
#17. Pull-Through Braid
The pull-through braid is a super easy hairstyle that packs a style punch. It may look complex, but there’s no need for traditional braiding techniques – you just need to create a series of ponytails!
Start by gathering a section of hair at the crown into a ponytail. Then, make another ponytail directly below. Split the first ponytail in half, pull the second ponytail through, and secure it with a hair tie. Repeat this all the way down your hair.
What’s great about the pull-through braid is its voluminous, chunky appearance, adding texture and depth to any look. It’s perfect for those with thin hair who want to create the illusion of thickness. Dress it up for special occasions or keep it casual for everyday style.
Final Thoughts
And there you have it! All of the different types of braids and step-by-step instructions on how to do them.
From the simple three-strand braid to the intricate, there are endless variations to choose from. Not only do they add a touch of style and elegance to any look, but they’re also practical.
Plus, with the rise of cultural representation in the beauty industry, braids are a great way to embrace diversity and celebrate different styles and hair textures.
So whether you’re heading to a music festival or just looking for a fun everyday look, there’s likely a braid that fits your hair type and needs.
Until next time,


MEET THE AUTHOR 🤩
Hollee is a licensed cosmetologist with over nine years of professional experience in the hair industry. With her unique insight and versatile experience, she’ll help you discover the latest hair trends or even crush your next DIY hair project.
🌟 Your Turn: Have you tried any of these braid types? Are there any other styles I should add to this list? Drop your thoughts in the comments section below! 👇🏼👇🏼👇🏼
🥰 Other Posts You’ll Like:
[adinserter block=”1″]
Source link